Showing posts with label flowers. Show all posts

Happy July, everybody! I hope everyone has something fun planned for this weekend!  We're probably keeping it low key around here (I'm guessing a 7 week old and fireworks are not a match made in heaven).  Barbecue, corn on the cob and my delicious Raspberry Pie (seriously, it is So Freaking Good) and hanging out with the fam... simple but fun!

But even when we're low key, I can't let the fourth go by without a little pomp and circumstance (it is one of my favorite holidays, after all!).  Just for fun, today I put together a patriotic garland (gotta do something with all of that scrapbook paper I never get around to using) and a super festive arrangement reminiscent of the sparklers and fireworks we're holding off on til next year.

Yesterday, I went to Michael's to raid their clearance holiday items.  All of their Fourth of July stuff was 50% off PLUS I had a coupon for an additional 15% off (stacking discounts makes me absurdly happy).  For less than $5 I picked up several sparkler spray picks and several rolls of patriotic ribbon and some truly adorable miniature pinwheels.

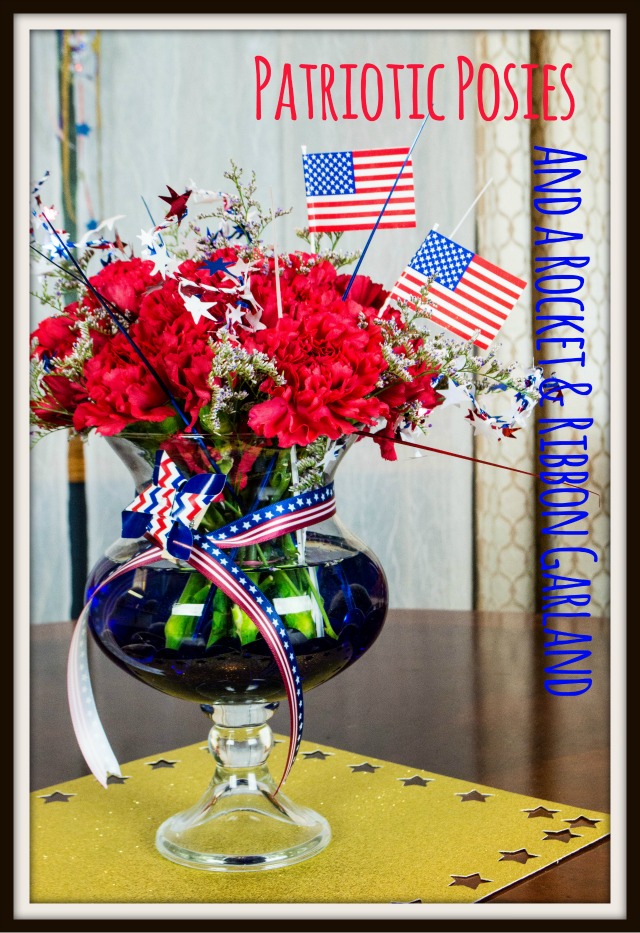
A quick trip today to Produce Junction (the local flower and fruit wholesaler) and I grabbed a big bunch of red carnations for $6.  A few hours of playing around and I had a couple of cute decorations to get us in the mood for the nation's birthday!

Patriotic Posies 


Hard not to love the Red, White and Blue!
I added some cobalt blue vase gems to a clear footed vase along with water and a drop of bleach.  I filled it with the red carnations and a few sprigs of white wild flowers and secured a Stars & Stripes ribbon around the neck with a pinwheel.  Finally, I pulled apart one of the sparkler picks and added it throughout the arrangement for some color and as a nod to the fireworks we'll be watching on television this year.  So cute! I love how it turned out!


Rocket & Ribbon Garland 


I have so much scrapbook paper, it's ridiculous.  I LOVE the stuff, but I never have time to scrapbook, so it just sits upstairs waiting to be put to good use!  For this project, I picked out some of my favorite red, white and blue patterns and cut rectangles and semi-circles out of them.  I then shaped them into tubes and cones and secured them with glue (but tape works just dandy).


I've got to be honest, attaching the cones to the tubes was a little annoying, but eventually I was able to center and tape them.  A piece of twine slipped through the top and was taped to the inside.


The next part was the most fun.  Using ribbons, sparkler picks, glitter, and stars punched out of scrap paper, I decorated the rockets and gave them tails of various lengths.  Once I was happy with them (or just tired of glue on my fingers) I hung them from my curtain rods along with more ribbons and glittering strings of stars.  So Fun!


Glitter? Check.  Unnecessary (but pretty!) flowers? Check.  An overdose of red white and blue (just in case someone forgets for ten seconds what the nation's colors are)?  Checkity check check.

I'm well on my way to being ready!  Next on the list is a good scrub of the house and some hand to hand combat at the grocery store (nothing puts you in a celebratory spirit like a good elbow to a feisty granny over some ground meat).  Man, I love holidays!


Have a fabulous and safe Fourth of July weekend, everybody!!


"Our mothers give us so many gifts.  They give us the precious gift of life, of course, but they also leave treasured lessons that can guide us along our journeys even when they are not longer with us." 
-Maria Shriver 

A Little History...
In 1905, a woman named Anna Jarvis began a campaign.  Her mother, Ann Reeves Jarvis had died that year, and Anna sought to honor her mother not only for who she had been to her personally, but also for the incredible work that her mother had done during and after the Civil war, caring for wounded soldiers on both sides of the battle and promoting peace.  

Five years later, the campaign gained real traction when a Philadelphia business man named John Wanamaker took up her cause and held a celebration of mother's in a local church that he had founded.  Whole states began to follow suit and, in 1914, President Woodrow Wilson made the holiday official.  

These days, Mother's Day has become synonymous with phone calls, greeting cards, and flowers (in fact, Anna Jarvis actually began campaigning against the day she helped to create when she felt that it had become too commercialized, a few years later).  But things are always what we make of them.  

Defining the Present - With a Little Flower Power
For me, Mother's Day is a reflection on how many amazing women - mothers or otherwise -  I am blessed to have in my life.  My own mother is a fantastic combination of beauty, grace, humor and kindness and her talent for making things beautiful is a constant source of inspiration.  Her grandmother, Grace, was the source of strength and beauty that she relied on.  So to honor some of these beautiful women, I'm taking it back to traditions: the wearing and giving of corsages to tell the world how wonderful they are.
  
When the holiday originally kicked off, Anna honored her mother by wearing and passing out her mother's favorite flower - the carnation.  Thus, the tradition of a Mother's Day corsage was born.  Generally, white is worn by daughters whose mother's are no longer alive; pink or red signifies mothers who are.  

*Special Note: Corsages are not worn by people who necessarily are mothers.  They are worn by women honoring their mothers.

Instead of purchasing a store bought corsage, I'm tailor making mine this year to celebrate the beautiful women who have given me - and this world - so much. 

Tools (per corsage)

1 Large Bloom Flower (A Carnation is traditional but Roses or Gerberas look great. Use what your mama likes!)
3-4 Small Accent Flowers (Baby's Breath, Asters, Hypericum Berries)
3-4 Pieces of Greenery (Fern, Dusty Miller, Boxwood)
Florist Tape
Florist Wire
Knife or Scissors
Ribbon
Corsage Pins

Let's Do This

 1.  The first step is to cut down your flowers and greenery to approximately six inches long.  (Don't worry - this Will Not be the final length!) Place in glass of water to keep them hydrated while you work with different sections.


2. Next, lay out 2-3 pieces of greenery, and layer 2-4 filler flowers on top.


  3.  Snip a 6 inch section of florist wire and wrap it twice around the stems, just where the base of the leaves and/or blooms start. 


4.  Layer your large bloom flower (For this one, I used a yellow rose as it's my mom's favorite color and roses hold up well) on top of the greenery packet, with the head resting below the smaller blooms (you want them to peak out the top).  Wrap the remaining ends of the florist wire tightly around the entire bundle.


5.  Briefly admire your work.  "Ahhh. I'm awesome."


6.  If you are preparing the corsage for the following day, stop at this point, but the blooms in a small glass of water and place in the fridge. If you are making the corsage for immediate use, continue to the next step.


7.  The day you plan to wear or present your corsage, remove from cool water and carefully shake out any excess water.  Cut off ends of stems, allowing only 2-3 inches below the blooms.


8. Tie off any remaining florist wire as close to the stems as possible and snip the ends.  Starting at the top of the stems/bottom of the blooms, begin wrapping florist tape tight around the stems, overlapping as you move down.  When you get to the bottom, pinch the ends of the stems and tape tightly together and begin working your way back up.  Back at the top again, secure the tape by tucking it into itself at the very top, or by tying it in a small knot around the stems.


9.  Finally, secure a small ribbon bow to the base of the flowers using florist wire, or even a dot of glue.  Add two corsage pins (if you only add one, the flower tends to turn sideways or upside down when pinned to clothing).


10. Present!  (If you're giving it as a gift, I recommend wrapping it in a cello bag with a ribbon. You can puff the bag out right before sealing it by blowing a bit of air in and then tying it off.)


Whether you're giving it as a gift, or wearing one to honor your own mother/grandmother/aunt or mom-figure, corsages are such a lovely way to show off your love and respect for the women in your life.  On a personal note, I'm thrilled and honored to join the ranks of mothers this year, and can only hope to live up to some of the amazing examples I've had in my own life!!

Happy Mother's Day, everyone!!

Okay, I admit it.  I'm a big fat liar.  I promised to post an extra nursery article last week, and I never got around to it.  (Sorry!)  The week just kinda got away from me, as weeks are wont to do.  

So this week, I'm actually writing about two smaller nursery projects/hacks that saved me a good bit of money.  Were either of them necessities for the room?  Heck no! But who cares about necessary when you're making something pretty for your soon-to-arrive munchkin!

Project 1: Pretty Pink Peonies
Inspiration: $70
My Cost: $0 
Savings: $70 (Mad math skillz, people.)

The Story: 
* Joss and Main Inspiration
I love Joss & Main.  Like, restraining-orders-might-be-necessary-at-some-point kind of love.  They have some of the most beautifully curated collections to drool over, buy out of and gather inspiration from.  Recently, as I was perusing their wares, I came across a beautiful arrangement of faux peonies. In particular, I was taken with the navy and white striped pot, as it managed to look both sophisticated and fun.  Because the colors I decided on for our nursery (pink, white and navy) are incredibly hard to find, this. was. perfect.  Except that it was $45, discounted from $70.

Now don't get me wrong, $45 for a quality arrangement isn't bad.  But when you're already spending a lot of money on all of the truly necessary baby-related paraphernalia, $45 or $70 for a small decoration seems a bit... well, unnecessary.  (Especially when I was fairly certain I could make a great knock off from pieces I already owned!)

So! On to the making:
 
The Supplies: 

1 Large Can, cleaned, dried and de-labeled (mine was 35 oz)
1 12x12 Sheet of Patterned Cardstock (I choose polka dots over stripes as they seemed a little more baby friendly!)
4-5 Faux Peonies (or other face flower), large bloom
5-6 Pieces Faux Greenery
Dry Florist Foam
White Spray Paint
Spray Adhesive
Craft Glue
2 Rubber Bands
Ribbon
Ruler/Pencil/Scissors


The Process: 

I started by giving my clean, dry, label-free tomato can 2 coats of white spray paint, focusing primarily on the upper and lower rim, and allowing it to dry completely between coats. 


 After it was dry, I measured the distance between the edges of each rim, marked out the strip on the inside of the cardstock and cut it to size.  The cardstock was just shy of being long enough to surround, so I wound up cutting two strips and planned to overlap them. (Oops! Ah well.)  As I intended for the finished product to be on a shelf, I knew the seamed side would sit to the back anyway. (And actually, after it was finished, you really couldn't tell.  Lucky break!)

Working on a covered surface, I gave the back of the cardstock strips a thorough coating of spray adhesive and then quickly affixed them to the can between the upper and lower rims.  Once I had them in place, I secured the top and bottom with a rubber bands to hold them in place while drying.


Once the glue was completely dry, I removed the rubber bands and moved on to the ribbon.  I initially chose a gold sparkly ribbon for the bottom (which you'll see in a few pics) but after a day or two, I decided I wanted something a little wider and a little less GOLD, so I swapped it out with some shimmery white ribbon (which you'll see in a few OTHER pics).

I cut the strip just long enough to overlap in the back.  I gave the very bottom of the can a thin line of craft glue (just above the rim), and attached the ribbon to the tacky surface.  I didn't find the need to use a rubber band or anything to secure it while drying, however, if you're using a thicker kind of ribbon, you may need to.  (You could also add a tiny bit of double sided tape to the ends to give them an extra grip.)  Let that baby dry.


The last step was to cut a section of florist foam to fit in the bottom of the can and begin adding your flowers.  Because the blooms I used were so fabulously large, I only needed four to make it look full and yet not over-packed.  Green leaves were used to break up the mass of pink and blue.  
And the result? Fresh, fun and perfect for the shelves in the nursery.  Plus I got to make it all out of pieces I already owned (which always makes me happy). 


So, what do you think?  Not bad for free!  Stay tuned for my second money saving nursery project!!


Flower arrangement, blooms, tropical, gorgeous, beautiful, beachy, beach, colorful, fragrant, animal safe, non-toxic
While nursery work and office/guest room final touches continue (and I will most likely write a bit about that later this week), I'm actually not writing about either of them today. 

I don't know about where you live, but here in the Northeast, it's been ceaselessly and mercilessly cold these past few months.  Like, Quit Your Job and Hibernate Til Spring cold.  And, at the present moment, all I can think about is jetting off to somewhere tropical and warm.  The lack of money and giant, third trimester belly, however, make that a little less than likely.  Boo.

Instead of pulling the covers over my head and giving Old Man Winter the one finger salute, I decided to bring a little spring and summer reminder into my home with a tropical sunset-inspired arrangement. (I'm a big believer in treating yourself to flowers every now and then, and I haven't done it in a while.)

I bundled up in every layer I have available (when you're already the approximate size and shape of a beach ball, adding a few more coats really doesn't make a difference. You just kind of turn into a Zorb.), and headed to Produce Junction - my new favorite place for finding amazingly priced flowers and plants (I highly recommend doing a little research to find regular farmers markets in your area).

After perusing their pretty posies, I finally decided on 1 dozen snapdragons in fuschia and canary yellow; 1 dozen snapdragons in orchid purple; and 1 dozen roses in a super-saturated coral shade.  I also grabbed some Phoenix Palm ('cause nothing says "beach" quite like a palm) and a bit of tree fern for some fluffy green texture.  All told, I spent $13.  (Whaaaaaat?! That's crazy talk.)


Once home, I set to work snipping the ends on the diagonal, stripping the leaves and pulling off any blooms that would rest below water level.

Leaves and blooms that hit below the water line can cause bacteria build up and kill your pretty arrangement faster!

To make the most of my tall snapdragons and large bloom roses, I selected a wide mouth pedestal vase that would make the most of their size and create a major presence.  For stability and extra color, I mixed several batches of vase gems and sea glass (color just makes me happy!)


I began the actual arrangement using the palms as a border and creating a vertical, one sided shape (which basically just means that this particular piece is being created to be viewed from one angle.  In this case it will be displayed on my buffet).

I then began adding longer sections of snapdragons, creating symmetry with length and color.  By working from the outer edges of the arrangement in, I also begin creating a support structure for the flowers in the center.


Once I had the skeleton in place, I began adding the roses (also known as Face Flowers or Focus Flowers), starting at the front of the vase and low point of the arrangement, and working my way up.


Using additional blooms as well as greenery, I filled in the rest of the spaces, making sure to add a variety of heights and colors.  Once I was pleased with the overall shape and fullness of the arrangement, I moved it to its display spot and made the final adjustments there (trust me, it's so annoying to have it JUST the way you want it and then have it all shift around when you move it!).
Voila!


As I happened to have some flowers left over, I threw together a smaller arrangement in a low square glass vase for the dining room table.  Two coordinating arrangements for $13? I feel warmer already. 


As I said, I'll most likely be posting about one of my other projects in the next couple of days, but this little dose of summer has certainly brightened my week so far!!  Go treat yourself to some gorgeous!


**One quick final note: The reason I decided to use these flowers in particular is because, according to the ASPCA's website, they're all non-toxic to cats.  As I have a little furry ninja who enjoys getting his 5-A-Day through all things off-limits, I try to be careful of what I bring into the house.  While I still do my best to discourage him, I'm not foolish enough to think that when I'm not around he heeds my instructions (he is a cat, after all).  
 If you have pets, I highly recommend looking into non-toxic flowers and plants to be on the safe side.  No pretty decor is worth their health!  


So, I was all on track with my crazy Christmas schedule of traveling, hosting, shopping, wrapping, cleaning and cooking.  I was feeling pretty good about myself when I stopped at a local indoor farmer's market (Produce Junction) to pick up a poinsettia for a friend.  And that's where I got myself in trouble.

Were I smart, I would have picked up my potted flower, paid for it, and left.  Alas, my ADD kicked in, and, as per usual, I was distracted by all the sparkly, colorful and INEXPENSIVE wonders in the store.  Instead of walking out with 1 medium poinsettia, I walked out with 5 poinsettias (including a GIANT one!), a 24 inch live balsam wreath and a bundle of 24 beautiful carnations in burgundy, white and tipped varieties.  All for $19.  $19!!  Can you blame me?

The trouble is, while the potted plants don't need much work, the live stuff requires some attention.  Thus, I have added to the crazy that is my life.  Well done, Me.

BUT I decided to keep it simple for both the wreath and the flowers and managed to add some color and holiday ambiance to our dining room in less than 45 minutes.  (Granted, then I had to take pictures, edit them and write about the process, so perhaps I should reconsider my time estimate... Naaaah.)

The Wreath 

The 24 inch balsam wreath was gorgeous but in need of a bit of trimming (Turns out nature isn't completely symmetrical. Who knew?).  That said, I really liked the wild, almost rustic appearance that it lent, and only clipped a few of the crazy outliers off.  (You kind of have to be careful when you start trimming, and always remember Less Is More.  Much like plucking eyebrows, you can wind up being a little TOO zealous which leaves you staring horrified into the bathroom mirror, contemplating how long it will take for them to grow back and whether or not you can hibernate for that length of time.  Not pretty. Wait, what were we talking about again?).


Setting the wreath clippings aside for later, I moved on to the question of what to add to the evergreens.  As the rest of my dining room is set very formally, I decided it would be nice to keep this piece natural and unobtrusive.  I grabbed a supply of pine cones (I collect them for decorating in the fall), and some artificial berry stems and set to work with my florist wire and wire cutters.

Working on the kitchen floor (It makes clean up easier and keeps everything more accessible), I attached pine cones by wrapping the wire through the scales and twisting onto the branches of evergreen.  I love the look of grouping items, so I randomly grouped by twos and threes (grouping smaller items - whether Christmas balls, pine cones, flowers or berries - gives them more presence.)

Even though the one pine cone (2nd pic) looks smooshed, it looks fine when placed with that side down.  Use what you got!

Once the pine cones were attached I moved onto the berry stems.  Using both red and silver (Okay, the wreath doesn't have to be COMPLETELY natural looking), I moved around the wreath, wrapping the wire stems into the form and branches.  Super easy!


Once I was completely finished, I added a simple gold ribbon to the top and centered it in my  dining room window and moved on to the flowers.  Wreath complete in 20ish minutes.  Go me!

Two Quick Wreath Making Tips: 

1.  Make sure to add your decorations to the outside and inside of the ring as well as to the middle.  I see so many fake looking wreaths that just have a bunch of flowers tacked to the center mass of the greens and, frankly, they look ridiculous.
 
2. Don't aim everything in the same direction.  Flowers, stems, branches... NATURE: Turns out it's not only asymmetrical, it also doesn't just point in one flowing direction.  Even if you work evergreens into a ring, there will be a few little buggers that stick backward, upward, downward, etc.  Trust nature.  Mimic the  contained chaos with your trimmings and you'll get a much more beautiful effect.

The Flowers

Okay, although carnations are not among my favorite flowers, I do think they get a bad wrap.  They often get added to inexpensive (Read: Cheap) arrangements that are offered in crummy groccery store "florist" sections.  The combination of bad arranging and lack of attention to the type of flower winds up with a look that is incohesive and BLAH.  That said, if you actually look at the bloom of the carnation, it is quite pretty.  They're frilly, colorful and HAPPY looking flowers that also happen to be quite hardy (and their lower cost doesn't hurt either).  SO.  When I found my grouping of beautiful blooms 24 for $4, how could I say no?


I generally gravitate toward large mixed arrangements that have a somewhat Wild English Garden feel to them, but in this case, I wanted something that was more modern, sleek and uncomplicated.  So this arrangement took almost no time at all.

I selected a low gold mosaic candle holder (sometimes you gotta get creative) to add some sparkle and shine to the blossoms.  The globe shape also made it easier to arrange sans vase gems, or florist foam.

Starting at the rim, I snipped the stems of the carnations on an angle and began placing them, while rotating the vase (rotating while building makes it easier to maintain an even symmetrical shape.  This is true of almost any arrangement that is going to be viewed from all sides).  As I spiraled inward, I began making the stems slightly longer to create a nice rounded shape.  Once I made it to the center and had filled in all of the color gaps, I was almost done.

Although I did want a minimalistic, modern shape, I didn't want it to look like a giant pomander.  Remember those evergreen wreath clippings?  I went back to my pile, stripped off any lower needles and inserted them at various points to add shots of green and variety to the shape.  So easy!  Love!

The very last thing I did was to discover the vase, though beautiful, looked a little TOO insubstantial by itself on the table.  It needed some height.  I could have found a new vase and started over, but really, ain't nobody got time fo' dat.  Instead, I grabbed a gold pillar candle stand and set the globe on top, creating a quick and easy pedestal.  Woot!


Ultimately, while I definitely added to my work load, I'm actually pretty pleased with my impromptu additions.  For the two additions alone (not including poinsettias), I spent only $9 and 45 minutes  (20 minutes on the wreath, another 15 on the arrangement, and 10 to clean up!).  In addition, it forced me to actually slow down for a short period and do something I LIKE to do. (Not that scrubbing bathroom floors isn't extremely rewarding too...).

Not bad for a little extra holiday cheer! 

Happy Christmas, Friends! I can't wait to see your pics and hear your stories about how all of your plans came together! 


As we've been having an exceptionally cool August this year, my brain is already moving on to All Things Fall (as it's my favorite season, my thoughts are never too far from there anyway).

The Finley Wreath from Grandinroad.com
As I was trolling the inter-webs for some autumn inspiration, I came across the Finley Wreath from Grandinroad and immediately fell in love.  It's full and rich looking and definitely says "Autumn," but shies away from being overly, ya know, orange.  The idea of dropping $80 (+shipping) on it, however, did not, as they say, butter my crumpet (I'm sure someone somewhere says that. And if they don't, they should).


Instead, I set to work making my own wreath, with a significantly reduced price tag (I think in total, I spent MAYBE $8). 


I'm hoping this was more attractive at some point...
I used a grapevine wreath form that I already had on hand (but you can purchase them for a few dollars at any craft store), as well as pine cones and acorns from last fall and faux foliage left over from old projects.  In addition, I found a fairly pathetic wreath (calling it a wreath is generous) at a thrift store that, despite its state, had some nice quality fruit on it.  Using wire cutters, I detached and kept the fruit and discarded what remained (and, really, I think that was the merciful thing to do...).


Ultimately, I used between 30 and 40 components per quarter.  I know it sounds like a lot, but it was the only way to give it the full look that it needed. 

The Floral Components for a Fall Wreath
Working with a glue gun, I began inserting green leaves around the entire perimeter of the wreath, turning the form frequently.  If any of the leaf bunches didn't suit me, I simply snipped them apart with wire cutters and attached them individually.  The majority of the foliage was placed in the same direction (clockwise) but every so often I'd place pieces in the opposite direction to give it a more natural shape (ratio about 80/20). 

Once I had a good base of green, I began spacing some of the larger pieces of fruit, leaving a small space on the lower left hand side for a bow.  Some of the fruit already had picks, but for the ones that didn't, I stole and attached picks from other floral stems (you could also break off pieces of bamboo skewers and insert them into the base of the fruit).  In addition to a bit of hot glue, I wrapped florist wire around the picks (or between the berries) to secure to the wreath form. (Nobody likes a floppy hand fruit.)

You can see the progression of the Autumn wreath as it starts to look more and more complete. Don't worry: there will be a point at the beginning where you go "ummmm...my wreath looks like crap..." I promise it comes together!
After the fruit was placed, I started adding leaves, pine cones and berries to any open space on the wreath itself, making sure to also look at the very inside and very outside edges (you want to ensure that it looks good from all angles).  As I said, I love The Full Look, so my motto was "More = Better!"

Finally, when I was pleased with the result, I tied a big fat bow with wired ribbon and attached it to the lower left hand side. 

I'm so pleased with how it turned out!  I may make a garland or swag to match it, but I haven't decided yet.  I have so many Halloween projects in the works, that adding more to the ever-expanding list may not be the smartest move!
 
Quick Tips: 

- Use what you have before buying new.  Check for old arrangements that you're not quite in love with anymore and re-purpose their components.  Also, try checking thrift stores.  Many times you can find super inexpensive pieces that can be pulled apart for parts. 

- Best Work Surface? Foam Core Board!!  I have several pieces of foam core for projects.  It's thicker than paper so I don't have to worry about bleed through onto wood surfaces, and it makes cleaning up super quick. 


Powered by Blogger.