A Pretty Closet Makeover (PLUS Wallpapering with Gift Wrap!)

/
1 Comments

Happy week of Thanksgiving!!  It's hard to believe that we're already here.  I swear these months get faster every year.

Considering this is the Season of The Guest, I decided this week to focus on an area that gets a tremendous amount of use and very little attention: our downstairs coat closet.

Okay, so it's not a make or break space.  Most of the people who visit my home probably don't care if it looks gorgeous.  But it's a workhorse of a space that I look at every day and that is in some desperate need of a little TLC.  The pictures that follow aren't pretty.  You may want to sit down. #holdme

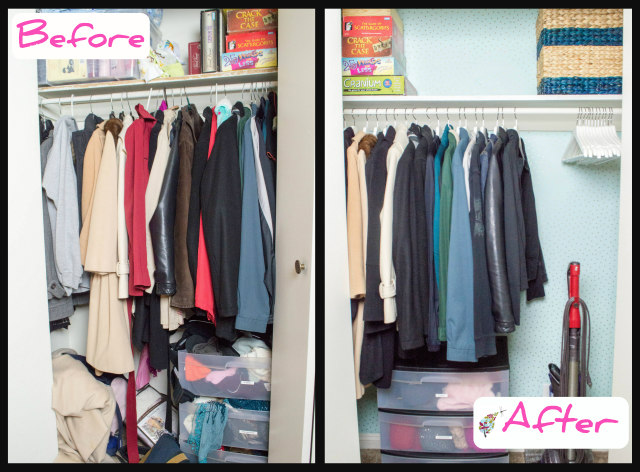
Yeah, so this is the current state of my closet.  Messier than a Trump 'do after a segway tour.

I honestly have no idea how it gets to this point.  I blame the cat.

Making it Clean

The first step was to pull everything out of it and sort it into piles: Trash, Relocate, Keep, Donate.

Trash and Relocate:

There wasn't a lot that needed thrown out - just a few tags and broken hangers.

Extra blankets got relocated to the bedrooms they belong to, the backpack went with luggage and the [exceedingly random] pile of washcloths was thrown back in the wash before being folded and put back in the linen closet (but seriously, how does that happen?).

After that I was left with the things that I generally wanted in the closet:  outwear, umbrellas, games, and a box of spare gifts.  But all of this needed sifted as well.

Donate:

I live in the northeast, so coats of varying weights are a necessity but they do tend to pile up.  I would much prefer to pare down to what I truly need and donate the rest.  After a quick sort, I found 9 (yep, NINE) that could go to a better home. I cleaned, and folded them and they're being donated to Burlington Coat Factory's Warm Coats and Warm Hearts Coat Drive

Donate a coat at Burlington and receive 10% off of your entire purchase!

I also kept a box nearby for Goodwill donations.  Superfluous hats, mittens, gloves and scarves made it into this box, along with games we no longer play, throws we don't need, gifts I'll probably never get around to giving and gym equipment I'm not likely to use (I mean, how many free weights and arm bands does one person need?).

Finally, I pulled all of my assorted hangers out and added them to a box of their own.  For a long time I've been wanting to replace them with matching coat hangers for both aesthetic and practical purposes (coat hangers are, in fact, better for your coats.  Who knew?).  In doing a little research a few months ago, I found out that dry cleaners are often in need of extra hangers and are happy to collect your old ones.  Perfect! (Any time I can avoid adding to a landfill, I'm a happy camper!)

Making It Pretty (And Using Gift Wrap as Wall Paper)

Once the extra stuff was out, the closet already looked MUCH better.  But I still wanted to make it a pretty space - something that made me happy when I opened up the doors to grab a jacket.

I started by giving the wooden shelf a fresh coat of white paint and cleaning the bar with a magic eraser.  A quick go over with the vacuum helped tremendously too.

I picked up some Bumerang hangers from Ikea.  Made of solid beech, eucalyptus, aspen or alder, these hangers come in white, natural and black and are only $4.99 for 8 (seriously good deal!).  I chose white to brighten up the space a bit, and made sure to have enough  for guest coats as well as our own.


As I've said before, living in a rental can be a little limiting.  I never want to sink too much money into something that can't go with me when we move, and many projects wouldn't be allowed anyway. But I really wanted to do something fun for the back of the closet.  Wallpaper can be expensive and is a serious pain in the rear to remove when moving (trust me, I've done it. #rookiemove), so I decided to try something a little different: wrapping paper!

Using a heavy, high quality wrapping paper and removable double-sided foam tape, I carefully measured, cut and adhered long sheets to the back of the closet.


I treated outlets the same way I would were I using real wallpaper: removing the face plates, cutting an X in the paper with a craft knife, cutting off any excess and then reattaching the hardware.


The results? A beautiful, neat space that makes me smile every time I open the doors.


Last but not least, I found some large pretty baskets (Michael's clearance for $5 each) for my gifts, then replaced things neatly on the shelf, bar and in the labeled drawers (Someday I want to replace the Sterilite drawer unit, but for now it serves its purpose).  I even found room to store our vacuum neatly! (Perhaps seeing it regularly will inspire me to use it more often.  Hey, it could happen.)

Finally, my favorite part: The Before and After!


After seeing how much I love the baby blue and gold polka dots on the back wall, I may add it to the sides along with some additional hooks. 
How much better is that?! 

Next on the list: Putting up [a baby-proof] Christmas.  No pressure there...

Have a wonderful Thanksgiving week, friends!


You may also like

1 comment:

  1. WOW!! Looks terrific Emily Grace!! Marvelous transformation.....

    ReplyDelete

Thanks for taking the time to read and comment!

Powered by Blogger.